
Free Amigurumi Sloth Crochet Pattern
Designer: Crochet Girl
Instagram: @crochet._.girl
Hello Amigurumi Lovers…
One of the free amigurumi crochet patterns we will share today is the amigurumi plush sloth, whose photos and design belong to Crochet Girl. You can learn how to crochet this sloth crochet using the free amigurumi pattern. Thanks to dear Crochet Girl for this cute sloth.

Amigurumi cats, amigurumi dolls, amigurumi dogs, amigurumi unicorns, amigurumi lambs, amigurumi dinosaurs, amigurumi foxes, amigurumi bears, amigurumi giraffes, amigurumi pigs, amigurumi birds, amigurumi penguins, amigurumi panda, amigurumi llama, amigurumi bunny, amigurumi clowns, amigurumi elephants, amigurumi hippos, amigurumi monkeys… All the amigurumi toys pattern step by step tutorials and ideas you are looking for are here… Don’t forget to visit our YouTube channel…
Abbreviations
R – Row
MR- Magic ring
Sc- Single crochet
Inc- Increase
Dec- Decrease
Slst- Slip stitch
Ch- Chain
Materials
• Main color yarn (purple)
• Face and hand / feet yarn (white)
• Eye patch yarn (grey)
• Nose yarn (black)
• Stud eye (18mm)
• Poly-fill
AMIGURUMI PLUSH SLOTH FREE PATTERN
Head
R1- R5.
Oval- chain.
X- single crochet
X+V- increase
Dot- slip stitch
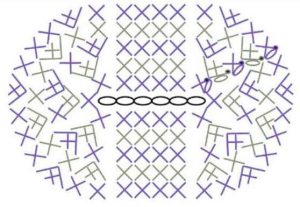
Start from chain 6, ch 1 then purple ring right outside the ch 6 is your R1. slst, then R2. will be the gray row.
R6-R10. 38 sc
R11. same as R5 of the diagram
but change inc to dec (32)
R12. 32 sc
R13. same as R4 of the diagram but change inc to dec (26)
R14. 26 sc
R15. same as R3 of the diagram but change inc to dec (20)
R16. same as R2 of the diagram but change inc to dec (14)
Leave a long yarn and cut it.
Eye patch
R1. and R2. of the diagram
Stitch it to the head like the picture below.
Pull a yarn twice through middle of the face.
Add stud eyes at the top corner of the eye patches.
Stuff the head, then stitch it up with the yarn that’s left.

Body
R1-R3. of the oval pattern (pg 3)
R4-R14. 26 sc
R15. 1 dec, 9 sc, 2 dec, 9 sc, 1 dec (22)
R16. 22 sc
R17. 1 dec, 7 sc, 2 dec, 7 sc, 1 dec (18)
Leave a long yarn and cut it.
Arms and legs
R1. 6 sc in MR
R2. 6 inc (12)
Switch color
R3-R4. 12 sc
R5. 6 dec (6)
R6-R17. 6 sc
R18. 3 sc
Assembly
1. The head should be nicely stuffed and have eyepatches and stud eyes attached.
2. Stuff just the end of the arms and legs.
3. Stuff the body.
4. Placing the arms on the side of the final row of the body (R17), stitch the body, arms, and head together.
5. Stitch the legs on around R5 of the body.
More amigurumi sloth ideas:


