Amigurumi Little Witch Crochet Free Pattern
Designer: Corelinhas
Instagram: @corelinhas
Hello Amigurumi Lovers…
One of the free amigurumi crochet patterns we will share today is the amigurumi Melinda the witch, whose photos and design belong to Corelinhas (online store). You can learn how to crochet these witch using the free amigurumi pattern. Thanks to dear Danny for this little witch.

Amigurumi cats, amigurumi dolls, amigurumi dogs, amigurumi unicorns, amigurumi lambs, amigurumi dinosaurs, amigurumi foxes, amigurumi bears, amigurumi giraffes, amigurumi pigs, amigurumi birds, amigurumi penguins, amigurumi panda, amigurumi llama, amigurumi bunny, amigurumi clowns, amigurumi elephants, amigurumi hippos, amigurumi monkeys… All the amigurumi toys pattern step by step tutorials and ideas you are looking for are here… Don’t forget to visit our YouTube channel…
Materials
• Yarn: You can be innovative and creative by using whatever colors and textures you want. I used several different colors of Círculo amigurumi yarn, which I will indicate throughout the recipe.
• Crochet hook (I used size 2.5)
• Tapestry needle
• Silicone fiber (stuffing)
• Fabric glue
• Stitch marker
• Pins
• Safety eyes (I used size 8)
Abbreviations
Sl = Slip stitch
Inc = Increase
Dec = Decrease
Hdc = Half double crochet
AMIGURUMI WITCH FREE PATTERN

Body and head
1. We will start with row 8176 (off white). Make a magic ring with 6sc.
2. 6 inc
3. (1sc + 1inc)x6 = 18 sts
4. (2sc + 1inc)x6 = 24 sts
5. (3sc + 1inc)x6 = 30 sts
6. (4sc + 1inc)x6 = 36 sts
7-9. 36 sc
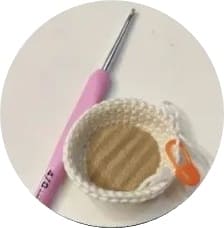
• To make the base firmer, you can use a circular-shaped piece of cardboard and glue it to the base of the witch, as shown in the image:

• Change to color 8990 (black) and do:
10. 7 sc + 2dec + 14 sc + 2dec + 7b = 32 sts
11. dec + 28 sc + dec = 30 sts
12. 30 sc in the back loop.
13. 5sc+1dec + 1sc + 1dec +10sc+1dec + 1sc + 1dec + 5sc = 26 sts
14. 1dec + 22 + 1dec = 24 sts
15. 24 sc
• Add stuffing
16. (2sc + 1dec)x6 = 18 sts
17. 18 sc
18. (1sc + 1dec)x6 = 12 sts
• Change to color 4456 (orange) and make:
19. 12 sc
• Change to color 7564 (porcelain) and make:
20. (1sc + 1inc)x6 = 18 sts
21. (2sc + 1inc)x6 = 24 sts
22. ( 3sc + 1inc)x6 = 30 sts
23. (4sc + 1inc)x6 = 36 sts
24. (5sc + 1inc)x6 = 42 sts
25-29.42 sts
• If you want to make our little witch’s neck firmer, place a tube of hot glue on the neck.
• Fill around with stuffing.
• Place the eyes between rows 26 and 27, 6 stitches apart. Be careful to place the eyes on the right side.
30. (5sc + 1dec)x6 = 36
sts
31. (4sc + 1dec)x6 = 30 sts 32. (3sc + 1dec)x6 = 24 sts
33. (2sc + 1dec)x6 = 18 sts
• Add stuffing
34. (1sc+1dec)x6 = 12 sts
35. 6 dec 6 sts
• Using a tapestry needle, close the piece by making an inverted magic ring.
Skirt
1. On row 12 of the body, with the piece turned upside down, using yarn 6614 (Lavender), make 30 sc.
2. 30 inc = 60 sts
3. (4hdc + 1hdc) x 12 = 72 sts
4-5. 72 hdc
6. Change to color 4456 (orange) and make 72 hdc. Fasten off and hide the yarn.
Legs
1. We will start with color 8990 (black). Make a magic ring with 4 sc.
2. 4 inc (8 sts)
3-4. 8 sc
Change to thread 8176 (off white) and make:
5-9. 8 sc
10. Fold in half and make 4 sc closing the leg. This will be the knee fold.
• The rest of the leg will be worked in flat crochet, going back and forth.
11-13. 4 sc
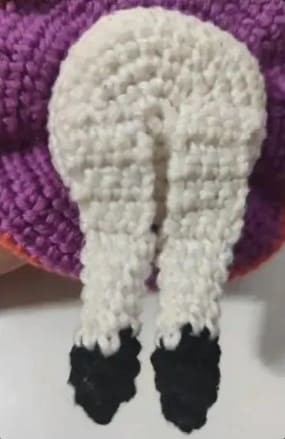
Sew the legs to the bottom of the body, as shown in the image:

Arms
1. With yarn in color 7564 (porcelain) make a magic ring with 6 sc. 2-3. 6 sc
• Change to color 8990 (black)
4. 6 sc
5. 6 sc in the back loop.
6-10. 6 sc
• Fold in half and close with 3 sc.
• For the sleeve of the blouse, turn the arm upside down and with color 4456 (orange) do:
1. 6 inc (12 sc)
2. 12 sc
3. (1sc + 1inc)x6 = 18 sts. Fasten off and hide the thread.
• Sew the arms to the side of the body on row 17.
Hair
1. With yarn 9802 (mauve), make a magic ring with 6 sc.
2. 6 inc
3. (1 sc + 1 inc) x 6 = 18 sts
4. (2 sc + 1 inc) x 6 = 24 sts
Now to make the hair strands, we will work in each stitch of round 4.
• From stitches 1 to 11 you will do:
17 chain stitches, return the chain skipping the first stitch and make 16 sc.
• In stitches 12 and 13 make 2 sl st.
• From stitches 14 to 24 you will repeat:
17 chain stitches, return the chain skipping the first stitch and make 16 sc.
Assembling the hair:
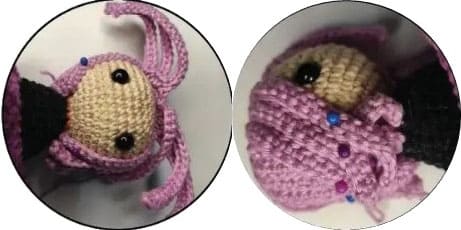
• To assemble, I recommend that before gluing or sewing, pin each strand around the head.
• To start marking, leave stitches 12 and 13 centered on the head.
• The three strands next to points 12 and the three strands next to point 13 will be glued to the side of the witch’s hair, as shown in the images below:

Hat
1. With color 8990 (black), make a magic ring with 4 sc.
2. (1 sc + 1 inc) x 2 = 6 sts
3. 6 sts
4. 6 inc (12 sts)
5. 12 sc
6. (1 sc + 1 inc) x 6 = 18 sts
7. With color 4456 (orange) make 18 sc.
8. With color 8990 (black) only in the back loop make 18 inc. (36 sts)
• Fasten off and hide the thread. Sew or glue the little hat on the side of the witch’s head.

More amigurumi witch ideas:


