
Horse Amigurumi Free Crochet Pattern
Designer: Olga Tikhonovich
Instagram: @tikho_toys_
Difficulty Level: Intermediate
A tiny amigurumi horse inspired by gentle childhood stories
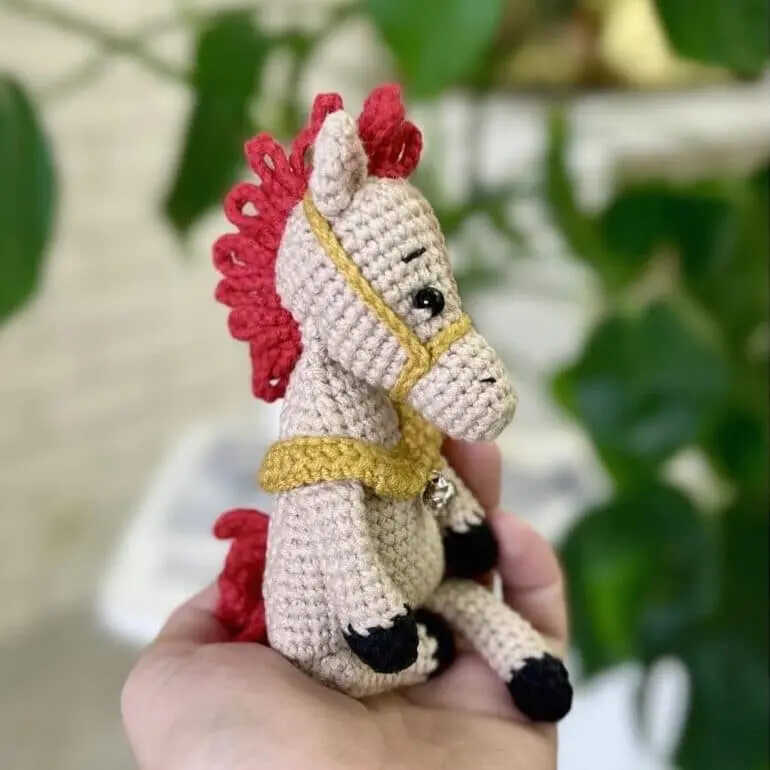
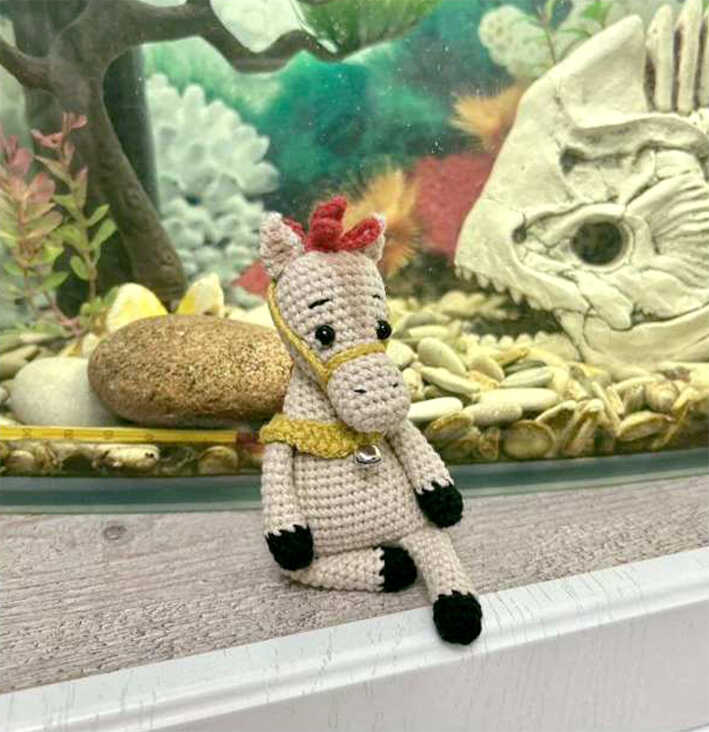
Designed by Olga Tikhonovich, this Mini Horse Amigurumi Doll Free Crochet Pattern is inspired by classic toy figures and soft nursery memories. It works beautifully as a shelf accent, a handmade keepsake, or part of your DIY Crochet Gift Ideas. You will also find lovely amigurumi horse ideas at the end of the pattern to spark new variations. Thank you to Olga Tikhonovich for sharing this charming design.
A beginner amigurumi horse pattern with timeless appeal.
This pattern is suitable for confident beginners, with a Difficulty Level marked as intermediate in the original PDF. The instructions are written in a clear, step by step, beginner friendly flow. If you have been looking for how to crochet amigurumi toys that feel cute yet manageable, this project is a smart starting point. Because of its structure, it also fits the idea of a Quick to Make Amigurumi. The finished toy measures approximately 14 cm and is perfect for Easy Crochet Projects or Low Sew Amigurumi Patterns fans.
The doll is made using YarnArt Jeans cotton yarn and a 2 mm crochet hook, along with hollow fiber stuffing and 5 mm bead eyes. Simple tools like tweezers, a large sewing needle, scissors, and soft shading with dry pastels help bring character to the face. While cotton yarn gives a neat and defined look, velvet yarn can be used for a plush effect, though the size will increase noticeably. For another delicate handmade project, you may also enjoy this sweet mini elephant amigurumi for added inspiration.
Materials and Tools
• Yarn: YarnArt Jeans (50 g / 160 m) or any similar yarn of the same thickness
• Crochet hook: 2 mm (or another size comfortable for you)
• Stuffing: hollow fiber
• Eyes: beads, 5 mm diameter
• Tweezers
• Large sewing needle for assembling parts
• Scissors
• Dry pastels or acrylic paints for shading
Abbreviations
MR – magic ring
ch – chain
sc – single crochet
inc – increase
dec – decrease
sl st – slip stitch
(…) x n – repeat the instructions in parentheses n times
All parts are crocheted; only the head and ears are sewn on.
DETAILED HORSE AMIGURUMI CROCHET PATTERN
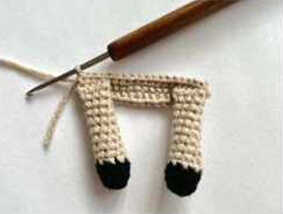
Legs (4 pieces)
Hoof
Crochet with black yarn.
R1: 8 sc in MR (8)
R2: 8 sc in back loops only (8)
R3: 8 sc (8)
Cut the black yarn. Continue crocheting with light beige yarn.
R4: 8 sc in back loops only (8)
R5–R12: 8 sc (8 rounds)

Stuff the legs halfway.
Close the opening by crocheting 4 sc together.
At the end, ch 1, cut the yarn, hide the tail.
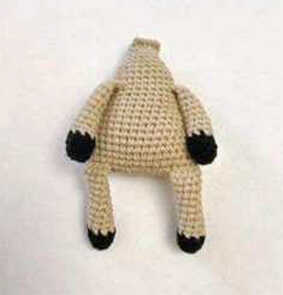
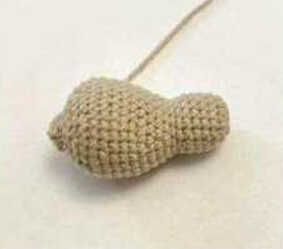
Body
R1: Ch 19. Starting from the second chain from the hook:
18 sc on one side of the chain, 18 sc on the other side (36)
Now we will crochet the legs into the body.
Place the legs on top of the body with the closed edge facing inward.
R2: 4 sc together with a leg, 10 sc, 4 sc together with a leg, 18 sc (36)
R3: 35 sc (35)
Do not finish 1 stitch; place a marker here
R4: dec, 16 sc, dec, 16 sc (34)
R5: dec, 15 sc, dec, 15 sc (32)
R6: 32 sc (32)
R7: dec, 14 sc, dec, 14 sc (30)
R8: dec, 13 sc, dec, 13 sc (28)
R9: 27 sc (27)
Do not finish 1 stitch; move the marker here
R10: dec, 12 sc, dec, 12 sc (26)
R11: dec, 11 sc, dec, 11 sc (24)
R12–R13: 24 sc (2 rounds)
R14: 23 sc (23)
Do not finish 1 stitch; move the marker here
Now we will crochet the remaining legs into the body.
Place them on top with the closed edge facing inward.
R15: 4 sc together with a leg, 6 sc, 4 sc together with a leg, 10 sc (24)
R16: 24 sc (24)
R17: 1 sc, dec, 8 sc, dec, 11 sc (22)
R18: 1 sc, dec, 6 sc, dec, 11 sc (20)
R19: dec, 6 sc, dec, 10 sc (18)
R20: dec, 5 sc, dec, 9 sc (16)
R21: dec, 4 sc, dec, 8 sc (14)
R22: dec, 3 sc, dec, 7 sc (12)
R23: dec, 2 sc, dec, 5 sc (9)
Do not finish 1 stitch
Stuff the body firmly up to the upper legs, then stuff lightly.
Close the opening by crocheting 5 sc together.
At the end, ch 1, cut the yarn, leaving a long tail for sewing the head.
Ears (2 pieces)
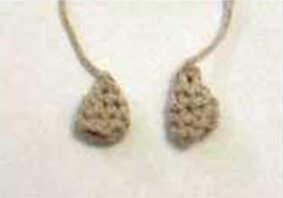
R1: Ch 8, join into a ring and crochet 8 sc (8)
R2: 8 sc (8)
R3: (2 sc, dec) x 2 (6)
R4: (1 sc, dec) x 2 (4)
R5: 2 dec, 1 sl st
Pull the yarn through the ear, leave a long tail at the bottom for sewing.
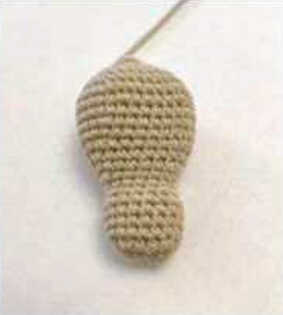
Head
R1: Ch 5. Starting from the second chain from the hook:
3 sc in one stitch, 2 sc, 3 sc in the last stitch,
2 sc on the other side of the chain (10)
R2: inc x 3, 2 sc, inc x 3, 2 sc (16)
R3–R6: 16 sc (4 rounds)
R7: 3 sc, dec, 6 sc, dec, 3 sc (14)
R8: 3 sc, inc, 6 sc, inc, 3 sc (16)
R9: 3 sc, inc x 2, 6 sc, inc x 2, 3 sc (20)
R10: 20 sc (20)
Crochet 1 sc and move the marker here
R11: 5 sc, inc x 2, 6 sc, inc x 2, 5 sc (24)
R12: 7 sc, inc x 2, 6 sc, inc x 2, 7 sc (28)
R13: 28 sc (28)
Crochet 1 sc and move the marker here
R14: 9 sc, inc, 8 sc, inc, 9 sc (30)
R15: 30 sc (30)
Crochet 1 sc and move the marker here
R16: (inc, 4 sc) x 6 (36)
R17: 36 sc (36)
R18: (2 sc, dec, 2 sc) x 6 (30)
R19: (3 sc, dec) x 6 (24)
R20: (1 sc, dec, 1 sc) x 6 (18)
Stuff the head firmly.
R21: (1 sc, dec) x 6 (12)
R22: dec x 6
Pull tight, fasten off, hide the yarn tail.
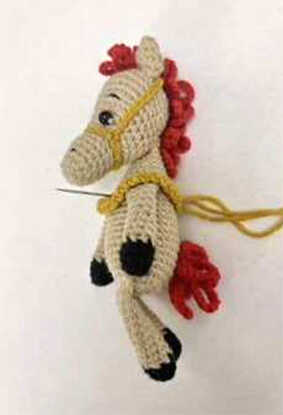
Assembly
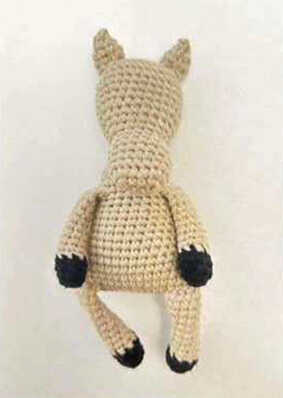
Sew the ears to the head between R18 and R19, spacing them 5 stitches apart.
Attach the body to the head by placing the closed edge of the body between R15 and R16 of the head.
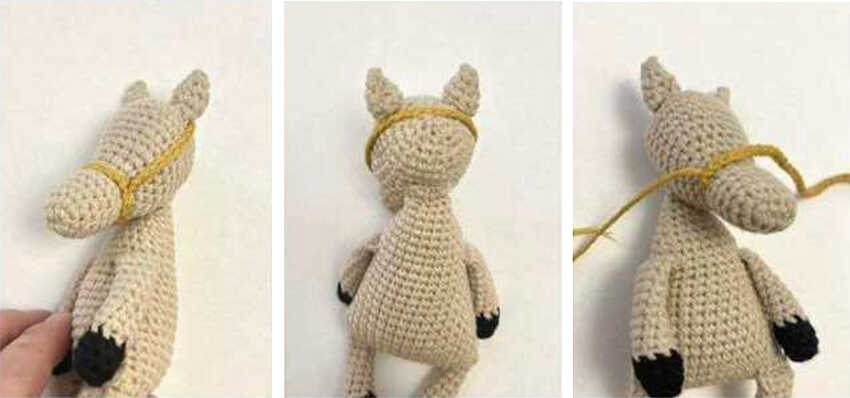
Bridle
Crochet a chain of ch stitches.
In the sample, 45 ch were used. Measure the bridle on the horse’s head as you work.
Start sewing from the side, in the indentation of the horse’s face (snout).
Wrap around and secure at the same point, then run the chain along the head, pass behind the ears, secure at the top, check the length, and fasten the second end on the opposite side of the snout.
Sew on the eyes.
Embroider the eyebrows and nostrils.
Mane
Crochet the mane using continuous chain loops, attaching them to the horse with sl st as you go.
Start at the top of the head.
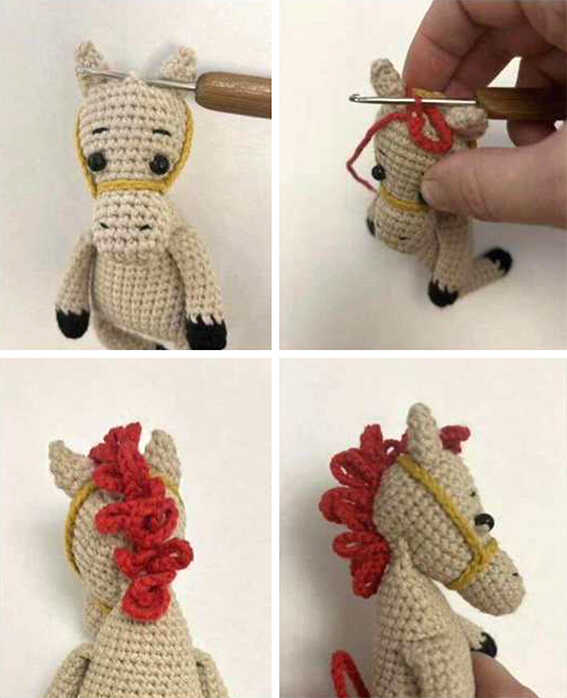
Make 1 sl st, ch 12, and secure with sl st at the starting point.
Crochet 15 strands along the center of the head, starting from the top and ending at the neck.
Tail
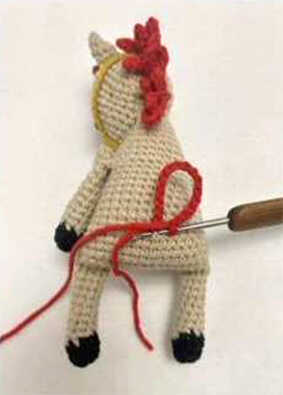
Crochet the tail using continuous chain loops, attaching them to the body with sl st.
Start at the back, between R6 and R7 of the body.
Make 1 sl st, ch 18, and secure with sl st at the starting point.
Repeat this process to make 5 strands.
Halter
R1: Ch 31. Starting from the second chain from the hook:
30 sc (30), turn
R2: Ch 1 for lifting, 30 sc (30), turn
R3: (ch 1, sl st) x 30
Cut the yarn, leaving a long tail for sewing.
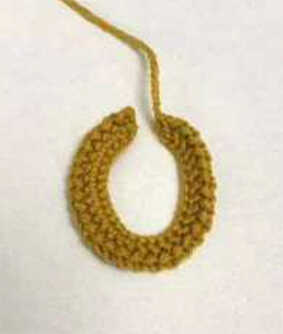
Wrap the halter around the horse above the front legs, join into a ring, and secure at the front and back with a few stitches, sewing through the body.
Finishing
Shade the head and ears using dry pastels or acrylic paints.
The horse amigurumi is finished.
Copyright & Credits
This pattern is designed by Olga Tikhonovich (tikho_toys_); finished toys made from this pattern may be shared or sold, provided the designer is clearly credited.