
Dalmatian Dog Amigurumi Crochet Free Pattern
Designer: Like A Liger Crochet
Instagram: @likealigercrochet
Etsy Shop: LikeALigerCrochet
Hello Amigurumi Lovers…
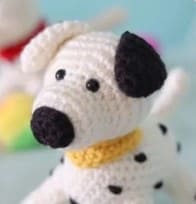
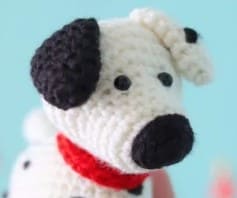
One of the free amigurumi crochet patterns we will share today is the amigurumi Dalmatian Dog Molly, whose photos and design belong to Like A Liger Crochet. You can learn how to crochet these dog using the free amigurumi pattern. Thanks to Like A Liger Crochet for this cute dalmatian dog.

Amigurumi cats, amigurumi dolls, amigurumi dogs, amigurumi unicorns, amigurumi lambs, amigurumi dinosaurs, amigurumi foxes, amigurumi bears, amigurumi giraffes, amigurumi pigs, amigurumi birds, amigurumi penguins, amigurumi panda, amigurumi llama, amigurumi bunny, amigurumi clowns, amigurumi elephants, amigurumi hippos, amigurumi monkeys… All the amigurumi toys pattern step by step tutorials and ideas you are looking for are here… Don’t forget to visit our YouTube channel…
Materials:
3.5 mm (E-4) crochet hook
Medium weight yarn in white, black and (left over) red or another color.
Pair of 6 mm safety eyes
Fiber fill
Yarn needle
Pins
Scissors
Stitch markers
Size: Approx. 10 cm (4″) tall when made with the indicated yarn.
Abbreviations:
MR: Magic ring
Sc: Single crochet
Rnd: Round
Slst: Slip stitch
St: Stitch
Ch: Chain
Dc: Double crochet
Hdc: Half double crochet
Inc: Increase
Dec: Decrease
Trc: Triple crochet

AMIGURUMI DALMATIAN DOG FREE PATTERN
Leg (make four)
Use white yarn.
Rnd 1: start 6 sc in mr [6]
Rnd 2: inc in all 6 st [12]
Rnd 3+4: sc in all 12 st [12]
Rnd 5: dec 4 times, sc in next 4 st [8]
Rnd 6-9: sc in all 8 st [8]
Slst in next st. Fasten off. You can weave in the yarn end now or later. Stuff the leg firmly with fiberfill.
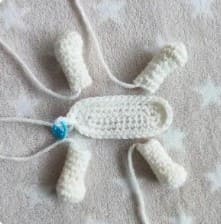
Tummy
Use white yarn.
Ch 12, start in the 2nd st from the hook.
Rnd 1: sc in next 10 st, 5 sc in next st, continue on the other side, sc in next 9 st, 4 sc in next st [28]
Rnd 2: inc in next st, sc in next 12 st, inc in next st, sc in next 14 st [30] Rnd 3: inc in next st, sc in next 12 st, inc in next 3 st, sc in next 12 st, inc in next 2 st [36]
Don’t fasten off, because in the next round, you’ll join the legs to the tummy.
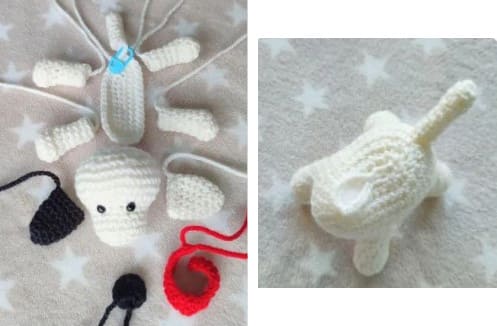
Legs to Tummy to Body
Use white yarn.
Take the legs as you’re now going to join them to the tummy. Make sure the paws all point forward.
Rnd 4: sc in next 3 st of the tummy, sc in next 4 st of front leg and tummy”, sc in next 4 st of the tummy, sc in next 4 st of hind leg and tummy, sc in next 4 st of the tummy (at the back), sc in next 4 st of hind leg and tummy”, sc in next 4 st of the tummy, sc in next 4 st of front leg and tummy, sc in next 5 st of the tummy (at the front) [36]
Rnd 5-9: sc in all 36 st, around the body and legs [36]
Rnd 10: sc in next st, dec, sc in next st, dec, sc in next 10 st, dec, sc in next st, dec, sc in next st, dec, sc in next 10 st, dec [30]
Rnd 11: sc in next 10 st, dec 6 times, sc in next 8 st [24]
Rnd 12: sc in next 7 st, dec 6 times, sc in next 5 st [18]
Stuff the body firmly with fiberfill.
Sew the back to close it, but leave a small opening at the front, where you can later sew the head onto.
* Make sure to start this stitch by working your hook through the leg first.
Head
Use white yarn.
Rnd 1: start 6 sc in mr [6]
Rnd 2: inc in all 6 st [12]
Rnd 3: (sc in next st, inc in next st) x 6 [18]
Rnd 4-7: sc in all 18 st [18]
Rnd 8: (sc in next st, inc in next st) x 6, sc in next 6 st [24]
Rnd 9: (sc in next 2 st, inc in next st) x 6, sc in next 6 st [30]
Rnd 10: (sc in next 4 st, inc in next st) x 6 [36]
Rnd 11+12: sc in all 36 st [36]
Place the safety eyes between Rnd 7 and 8 with an interspace of 2 st. Rnd 13: (sc in next 4 st, dec) x 6 [30]
Rnd 14: (sc in next 3 st, dec) x 6 [24]
Rnd 15: (sc in next 2 st, dec) x 6 [18]
Rnd 16: (sc in next st, dec) x 6 [12]
Stuff the head firmly with fiberfill.
Rnd 17: dec 6 times [6] Slst in next st.
Fasten off and weave in the yarn end.
Nose
Use black yarn.
Rnd 1: start 6 sc in mr [6]
Rnd 2: inc in all 6 st [12]
Slst in next st. Fasten off. Make sure to leave a long tail.
Ear (make two)
Use black yarn for one ear, and white yarn for the other ear.
Rnd 1: start 6 sc in mr [6]
Rnd 2: (sc in next st, inc in next st) x 3 [9]
Rnd 3: sc in all 9 st [9]
Rnd 4: (sc in next 2 st, inc in next st) x 3 [12]
Rnd 5-8: sc in all 12 st [12]
Slst in next st. Fasten off. Make sure to leave a long tail.
The ears don’t need to be stuffed.
Tail
Use white yarn.
Rnd 1: start 6 sc in mr [6]
Rnd 2-8: sc in all 6 st [6]
Slst in next st. Fasten off. Make sure to leave a long tail. The tail doesn’t need te be stuffed.
Collar
Use red or any color yarn.
Ch 22 (make sure to leave a long tail at the start of the chain), start in the 2nd st from the hook.
Row 1: sc in next 8 st, hdc in next st, dc in next st, tc in next st, dc in next st, hdc in next st, sc in next 8 st.
Fasten off. Make sure to leave a long tail.
Assembly
Sew the nose onto the snout and the ears onto the head, between Rnd 11 and 14, with an interspace of 4 st. With black yarn embroider two spots on the white ear, each over one st. Sew the tail onto the back of the body. Make it point upwards to show Molly’s a happy puppy. Embroider a couple of spots on Molly’s body using black yarn and spread them evenly. All my spots are embroidered over one st horizontally, but of course, you can also play with spot sizes and positioning.
Sew the head onto the little opening at the front of the body. You can make Molly look down, up, sideways or whatever you want!
Tie the collar around dog’s neck and secure it at the back. The wider part is the front. Weave in all the yarn ends.
Congratulations, you now have a new best friend!

More amigurumi dalmatian dog ideas:


