
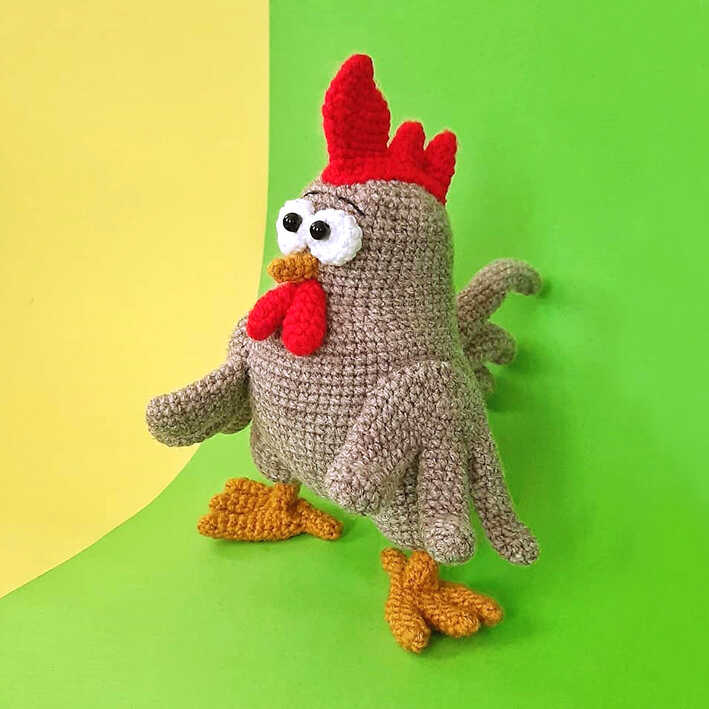
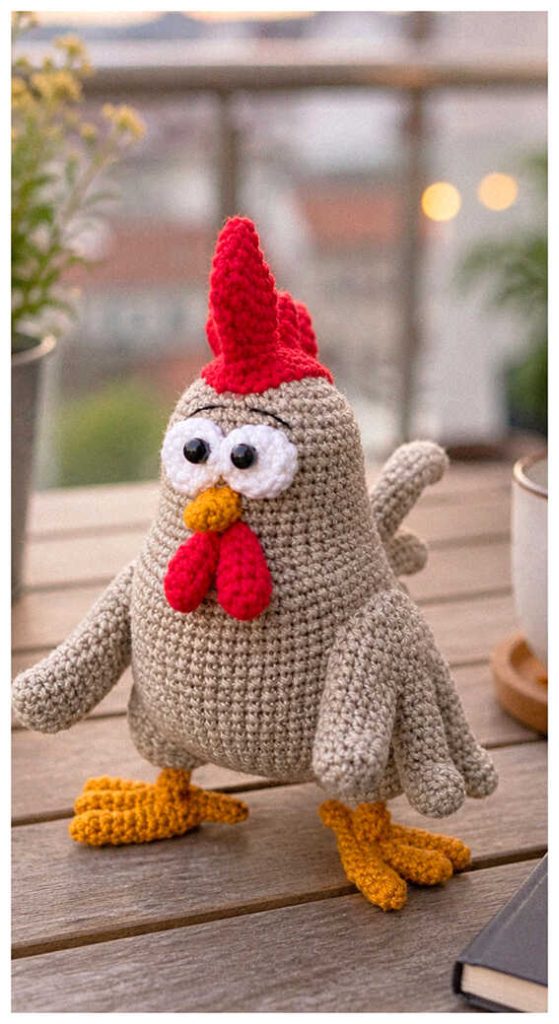
Free Rooster Amigurumi Pattern for Unique Crochet Gifts
Designer: Knitting House Sveta
Instagram: @knitting_house_sveta
Difficulty Level: Intermediate
A bold handmade project to bring character and charm to your crochet time.
Create something eye-catching with this free rooster amigurumi pattern designed by Svetlana Bozhko. With its detailed shaping and expressive features, this cute crochet animal makes a unique handmade gift idea, decor piece, or soft crochet toy. Worked in the round with separate parts, it offers a more structured build, and we sincerely thank Svetlana Bozhko for sharing this beautiful design. You’ll also find more inspiring rooster amigurumi ideas at the end of the pattern.
Scroll down to follow the full pattern and explore each step in detail.
This is an intermediate amigurumi pattern with multiple parts and assembly steps. The spiral construction and embroidered features create a polished result. If you enjoy detailed projects, you might also love the mini owl amigurumi, which fits beautifully into decorative collections.
The design uses lightweight yarn and a 2 mm hook for fine detail, along with beads for expressive eyes. You may also enjoy the mini bunny amigurumi as a fun and creative contrast project.
You’ll notice how this rooster gains bold character with each detailed step.
Materials and Tools
• Yarn:
▸ Alize Superlana Klassik (body color)
▸ YarnArt Baby Cotton (white for eye whites)
▸ YarnArt Baby (red for comb and wattles)
▸ Yarn for beak and legs
• Crochet hook 2 mm
• Fiberfill stuffing
• 5 mm beads (for eyes)
• Needle for sewing parts
• Pins
• Scissors
Abbreviations
MR — magic ring
ch — chain
sc — single crochet
hdc — half double crochet
dc — double crochet
inc — increase
dec — decrease
sl st — slip stitch
(…) x n — repeat n times
HOW TO MAKE A ROOSTER AMIGURUMI YOU’LL WANT TO MAKE
Legs (make 2)
Crochet three toes.
R1: 6 sc in MR (6)
R2–R5: 6 sc (4 rounds)
Do not cut yarn after the third toe, continue:
R6: crochet across toes: 3 sc on first toe, 3 sc on second, 6 sc on third, 3 sc on second, 3 sc on first (18)
R7: 18 sc
R8: (1 dec, 7 sc) x 2 (16)
R9: 1 dec, 6 sc, 1 dec, 1 sc, 3 sc in BLO, 2 sc (14)
R10: 1 dec, 5 sc, 1 dec, 3 sc in BLO, 2 sc (12)
R11: 6 dec (6)
R12–R15: 6 sc
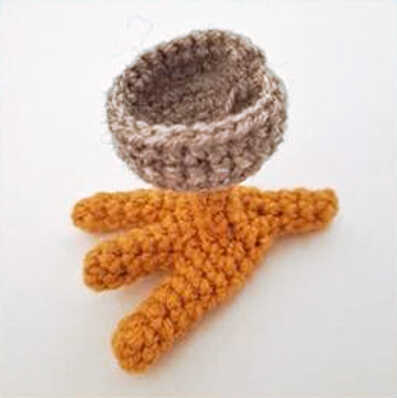
Tighten stitches, hide yarn.
R16: work in front loops of R9–R10: 6 sc
R17–R20: 6 sc
Change yarn to body color.
R21: 6 inc (12)
R22: 12 inc (24)
R23–R25: 24 sc
Fasten off, leave tail.
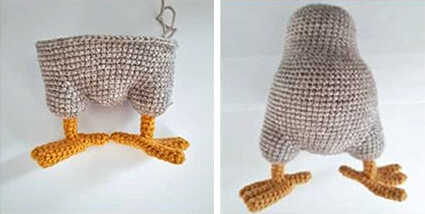
Body
Stuff as you go. Marker runs along the back.
R1: 6 sc in MR (6)
R2: 6 inc (12)
R3: 12 inc (24)
R4: 24 sc
Attach legs in next round:
R5: 4 sc, 4 sc joining leg and body, inc, 6 sc, inc, 4 sc joining second leg, 4 sc (26)
R6: along back: 3 sc, inc, along leg inc, 18 sc, inc, along belly 10 sc, inc, along second leg 18 sc, inc, along back 3 sc (64)
R7–R11: 10 sc, inc, 12 sc, dec, 14 sc, dec, 12 sc, inc, 10 sc (64)
R12: 24 sc, (1 inc, 2 sc) x 5, inc, 24 sc (70)
R13–R19: 70 sc
In R19 make 1 offset stitch.
R20: (2 sc, dec) x 3, 46 sc, (1 dec, 2 sc) x 3 (64)
R21: (1 sc, dec) x 3, 46 sc, (dec, 1 sc) x 3 (58)
R22–R26: 58 sc
R27: 18 sc, 1 dec, (2 sc, dec) x 5, 18 sc (52)
R28: 18 sc, 1 dec, (1 sc, dec) x 5, 17 sc (46)
R29–R31: 46 sc
R32: 4 sc, 1 dec, 9 sc, 1 dec, 12 sc, 1 dec, 9 sc, 1 dec, 4 sc (42)
R33–R39: 42 sc
R40: (5 sc, dec) x 6 (36)
R41: (4 sc, dec) x 6 (30)
R42: (3 sc, dec) x 6 (24)
R43: (2 sc, dec) x 6 (18)
R44: (1 sc, dec) x 6 (12)
R45: 6 dec (6)
Close opening.
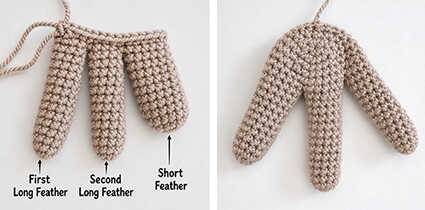
Tail
Crochet three feathers.
R1: 5 sc in MR (5)
R2: 5 inc (10)
Long feather: 20 rounds of 10 sc
Medium feather: 16 rounds of 10 sc
Short feather: 14 rounds of 10 sc
Join feathers:
R1: 4 sc on short feather, 2 sc on medium, 7 sc on long, skip 3 stitches on long, 2 sc on medium, skip 3 stitches, 3 sc on short (20)
R2: 20 sc
Fasten off, leave tail for sewing. Sew gaps between feathers.
Wings (make 2)
Do not stuff.
Short feather:
R1: 6 sc in MR (6)
R2: 6 inc (12)
R3–R11: 12 sc
Fasten off.
Long feathers (make 2):
R1: 6 sc in MR (6)
R2: (1 sc, inc) x 3 (9)
R3–R13: 9 sc
Do not cut yarn after second feather:
R14: 5 sc on first long feather, 5 sc on second, 12 sc on short feather, 4 sc on second, 4 sc on first (30)
R15–R17: 30 sc
R18: (3 sc, dec) x 6 (24)
R19: (2 sc, dec) x 6 (18)
R20: (1 sc, dec) x 6 (12)
R21: 6 dec (6)
Close opening.
Eye Whites (make 2)
Do not stuff.
R1: 6 sc in MR (6)
R2: 6 inc (12)
R3–R4: 12 sc
R5: 6 dec (6)
Close opening.
Beak
R1: 4 sc in MR (4)
R2: 4 sc
R3: 1 inc, 3 sc (5)
R4: 1 inc, 4 sc (6)
Fasten off, leave tail.
Wattles (make 2)
Do not stuff.
R1: 6 sc in MR (6)
R2: (1 sc, inc) x 3 (9)
R3: 9 sc
R4: 1 dec, 7 sc (8)
R5: 1 dec, 6 sc (7)
R6: 1 dec, 5 sc (6)
Close opening.
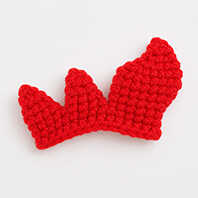
Comb
Do not stuff.
Small spikes (make 2):
R1: 6 sc in MR (6)
R2: 6 sc
R3: (1 sc, inc) x 3 (9)
R4: 9 sc
Large spike:
R1: 6 sc in MR (6)
R2: 6 sc
R3: 2 sc, (3 sc in one stitch) x 2, 2 sc (10)
R4: 4 sc, (3 sc in one stitch) x 2, 4 sc (14)
R5: 6 sc, (3 sc in one stitch) x 2, 6 sc (18)
R6: 18 sc
R7: 1 dec, 14 sc, 1 dec (16)
R8: 1 dec, 12 sc, 1 dec (14)
R9: 1 dec, 10 sc, 1 dec (12)
Join all parts:
R10: 6 sc on large spike, 5 sc on first small spike, 9 sc on second small spike, 4 sc on first small spike, 6 sc on large spike (30)
R11–R12: 30 sc
Fasten off, leave tail.
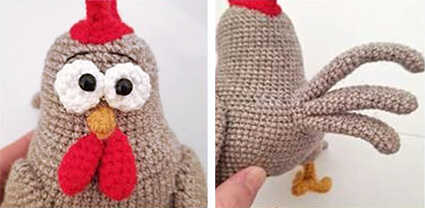
Assembly
1. Sew the comb
2. Sew eye whites and attach bead pupils
3. Embroider eyebrows
4. Sew beak and wattles
5. Sew tail and wings, shape feathers
Your rooster is ready!
Copyright & Credits
This pattern is designed by Svetlana Bozhko; you may sell finished toys made from this pattern, but please credit the designer by tagging @knitting_house_sveta and linking to their social media when sharing your work.